Manage flights in SAFEOPS

If you have followed the previous steps, your SAFEOPS environment is, then, complete. You can begin processing your flights.

To be considered complete, your environment should include at least:

  • A station with services
  • An airline company with services
  • Agents assigned to a station

1. Assign agents to flights

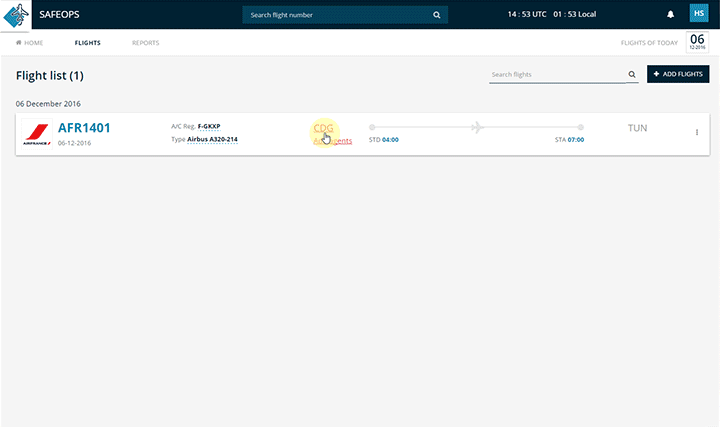
It’s the first stage in the Flight management in SAFEOPS.
You will have to choose the agents who will be in charge of treating the flight and assign them what to do.
To access the Allocation page of a flight:

  • In the main menu, click on Flights
  • In the drop down menu, click on List of flights
  • In the flight list, click on the station code
  • You will be redirected to the Allocation flight page.

In the Allocation page, if your flight passes by 2 stations, you can switch from a station to another by clicking on the station button.

Assign agents to flight’s operations

This step will enable you to select which agents will be working on a flight and to assign them the operations.

  • In the flight Allocation page, click on the button Assignment to operations.
  • In the dialog box, tick the operations to assign your agents.
  • Click on Close when you are done.
  • The assigned agents will, now, be displayed in the page.
How to assign agents to the flight's operations

How to assign agents to the flight's operations

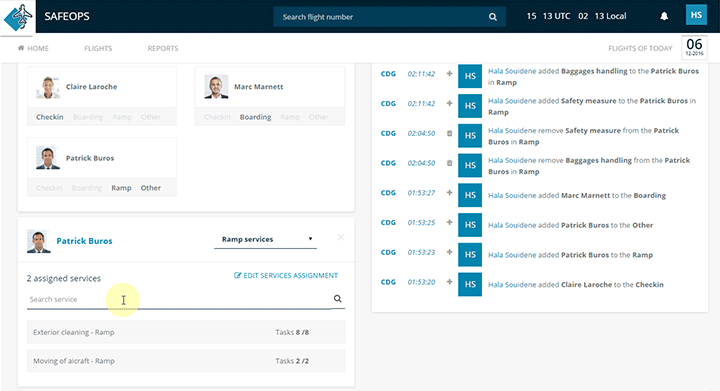
In this step, agents will be automatically assigned to the operations services. In case of need, you can change the services assignment of an agent.

Manage the agents services

To change the services assignment of an agent:

  • After assigning the agents to the flight’s operations and closing the operations dialog box, click on an operation of one of your agent.
  • A new panel appears below, it’s the agent’s assignment details: you can see which services are assigned to the agents with regard to the operations he was assigned to.
  • Click on the button Services assignment
  • In the dialog box, select the services you have to assign to your agent and uncheck those you need to remove him from.
  • Click on Close when you are done.
How to manage the agents services

How to manage the agents services

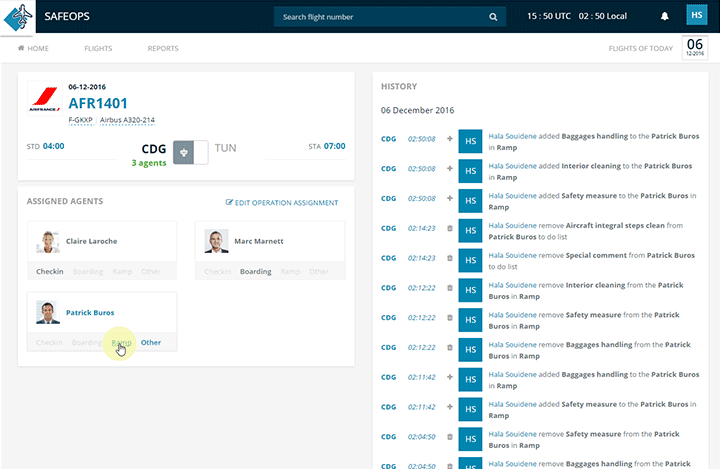
When an agent is assigned to a service, he receives automatically all its tasks.

Manage an agent’s tasks

In case of need, you can change the tasks assignment of an agent.

  • In the agent assignment details panel click on the Tasks link of a service.
  • In the dialog box, select the tasks to be assigned to your agent and uncheck those you need to remove.
  • Click on Close when you are done.
How to add a task to a service

How to manage an agent’s tasks

Once assigned to the flight, your agents will find automatically their assignment in the Android application. They will see which flight they are affected to, the services they need to take care of and the tasks to be submitted.

2. Follow the ground operations in real time

Once you have assigned your agents to a flight, you can follow the progress of ground operations as soon as they begin.

When the first flight task is submitted via the Android application, SAFEOPS will notify you in real time that flight operations have begun.

Flight timeline

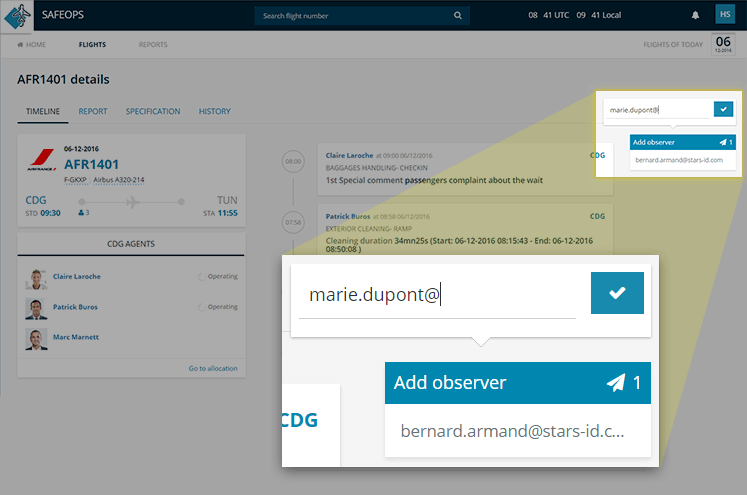
To follow the flight services progress, go to its details page by clicking on the flight number.
In the details page, in the timeline tab, you will find the assigned agents list and you will see appearing the services progress in the timeline in a real time.
You can, also, see if an agent started working or has he finished all his tasks.

Flight timeline

Flight timeline

Add an observer

You can send invitations to your partners, if they don’t have a SAFEOPS account, to follow the ground operations in a real time.
Add an observer :

  • Log on to the details page by clicking on the flight number
  • In the timeline tab, click on the blue button Add observer, in the right upper side.
  • In the appearing field, simply add your guest’s e-mail address, then click on the send button.
  • Your guest will receive an e-mail with a link to the web page reserved to the flight. He can find the assigned agents list and the timeline of the flight.
Add an observer to the flight

Add observer

Add an observer to the flight

What your observers see

3. Obtain the Flight Report

Your Flight Report will be automatically filled with the flight itinerary, the services and tasks coming from the Android application.

Validate the flight report

You can preview, at anytime, the Flight Report. But, it will remain in a preview only mode until it is validated.
In order to obtain a Validated report, you will have to add the following information:

  • the aircraft registration number
  • the actual time departure
  • the delay codes
  • the debriefing

Once these information given, your report is complete and you can validate it.
The report validation allows the locking of the following information:

  • the aircraft registration number
  • the aircraft type
  • the actual time departure
  • the delay codes
  • the debriefing
  • the unfulfilled tasks of your agents

Once validated, the PDF copy of the Flight Report can be downloaded and sent to different emails addresses.
To validate your Flight Report:

  • In the Report tab of the flight details page, click on the red button Validate report of the Report State panel, in the upper middle of the page.
  • In the dialog box appearing, confirm your choice by clicking on Validate report.
  • A new page will display the preview of the final Report.
Valid Report preview

Valid Report preview

Download a PDF copy of the flight report

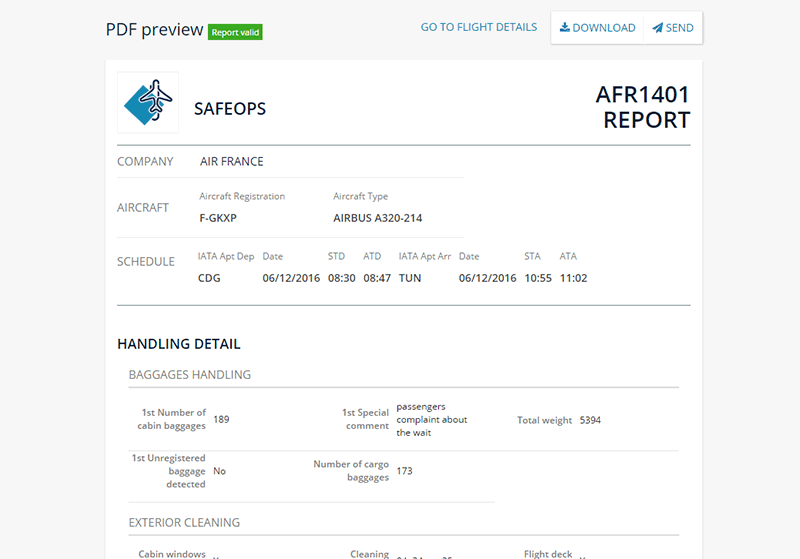
Once the Flight Report validated, you can download it:

  • Go to the flight details page and then to the Report tab
  • Validate the Flight Report
  • Click on the upper right panel Report Preview
  • In the PDF preview page, click on the button Download in the upper right side of the page.
  • The download will start automatically.